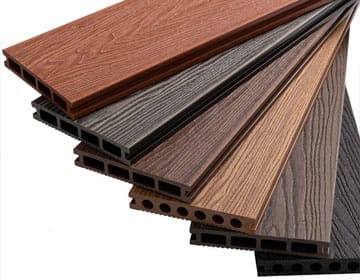
Wood-Plastic Composite (WPC) wall panels have become a popular choice for modern interiors. They combine the natural beauty of wood with the durability and low maintenance of plastic. However, achieving a flawless installation begins with knowing how to cut WPC wall panel correctly. Improper cuts can lead to chipping, uneven edges, or wasted materials. This comprehensive guide covers everything: from the best way to cut WPC wall panels to tools, blade types, step-by-step instructions, safety precautions, cost and time-saving tips, and professional best practices.
Why Correct Cutting Matters
Cutting WPC panels isn’t just about trimming them to size—it affects:
- Appearance: Clean cuts ensure seamless installation.
- Durability: Avoiding chips and cracks maintains panel integrity.
- Efficiency: Proper cutting saves time and reduces errors.
- Safety: Following best practices prevents accidents and dust exposure.
Mastering best practices for cutting composite wall panels ensures professional-looking results whether you’re a DIY enthusiast or a contractor.
Tools for Cutting WPC Wall Panels
Having the right tools is essential for clean, accurate cuts.
1. Circular Saw
- Best Use: Long, straight cuts.
- Advantages: Fast, precise, ideal for large panels.
- Pro Tip: Use a fine-tooth carbide-tipped blade for cutting WPC panels without chipping.
2. Jigsaw
- Best Use: Curved cuts, notches, and cutouts.
- Advantages: Offers more control for complex shapes.
- Comparison: Circular saw vs jigsaw for WPC panels — circular saws excel at straight lines, jigsaws for irregular cuts.
3. Miter Saw
- Best Use: Angled cuts and precise straight cuts.
- Tip: Keep the panel flat and feed slowly to prevent rough edges.
4. Utility Knife
- Best Use: Thin panels.
- Method: Score multiple times along the cut line and snap.
5. Router
- Best Use: Edge trimming and detailed cutouts.
- Tip: Clamp panels securely to prevent movement.
6. Straight-Edge Guide and Clamps
- Purpose: Ensure accurate straight cuts, especially for long panels.
How to Measure and Cut WPC Wall Panels Accurately
Accurate measurement is the foundation for precise cuts.
- Measure Twice, Cut Once: Double-check all measurements.
- Mark the Cutting Line: Pencil or grease pen on the back side.
- Use a Straight-Edge Guide: Keeps long cuts straight.
- Allow Expansion Gaps: Leave 1/8” per 10 feet for thermal expansion.
Keyword: How to measure and cut WPC wall panels accurately.
How to Make Clean Cuts on WPC Panels
Achieving smooth, chip-free edges requires proper technique:
- Use WPC panel cutting blade types suitable for your tool—carbide-tipped or fine-tooth blades are ideal.
- Apply masking tape along the cutting line to prevent chipping.
- Cut slowly and steadily.
- For angled cuts, dry-fit panels first.
Keywords: How to make clean cuts on WPC panels, cutting WPC wall panels without chipping.
Circular Saw vs Jigsaw for WPC Panels
| Tool | Best Use | Pros | Cons |
|---|---|---|---|
| Circular Saw | Straight long cuts | Fast, accurate, great for large panels | Needs stable surface, risk of chipping |
| Jigsaw | Curves, corners, irregular cuts | Excellent for detailed cuts | Slower, requires steady hand |
Cutting WPC Panels for Corners
Corners require extra precision:
- Measure twice, mark clearly.
- Use a jigsaw for inner corners or outlet cutouts.
- Dry-fit before final installation.
- Sand edges lightly for a perfect fit.
Keywords: Cutting WPC panels for corners.
DIY WPC Wall Panel Installation Cutting Tips
- Test cuts on scrap panels.
- Clamp panels during cutting.
- Use proper blade for thickness.
- Keep work area clean and ventilated.
Keywords: DIY WPC wall panel installation cutting tips.
Safety Precautions When Cutting WPC
- Wear safety glasses, gloves, and a dust mask.
- Work in a well-ventilated area.
- What dust is produced when cutting WPC? Fine composite dust can irritate skin and lungs.
- Clamp panels securely.
- Avoid rushing—fatigue causes accidents.
Keywords: Safety precautions when cutting WPC, what dust is produced when cutting WPC?
Step-by-Step WPC Wall Panel Cutting Table
| Step | Action | Recommended Tools | Blade/Bit Type | Estimated Time | Difficulty | Key Tips & Keywords |
|---|---|---|---|---|---|---|
| 1 | Measure & Mark | Tape measure, pencil, masking tape | N/A | 5–10 min | Easy | How to measure and cut WPC wall panels accurately |
| 2 | Secure Panel | Clamps, workbench | N/A | 3–5 min | Easy | Safety precautions when cutting WPC |
| 3 | Choose Tool | Circular saw, jigsaw, miter saw, utility knife | Carbide-tipped / fine-tooth | 2–3 min | Easy | Tools for cutting WPC wall panels, WPC panel cutting blade types, circular saw vs jigsaw for WPC panels |
| 4 | Execute Straight Cuts | Circular saw / miter saw | Fine-tooth / carbide | 5–15 min | Medium | Best way to cut WPC wall panels, how to make clean cuts on WPC panels |
| 5 | Execute Curved Cuts & Corners | Jigsaw | Down-cut fine-tooth | 10–20 min | Hard | Cutting WPC panels for corners, DIY WPC wall panel installation cutting tips |
| 6 | Edge Finishing | Sandpaper (220-grit), file | N/A | 5–10 min | Easy | Cutting WPC wall panels without chipping |
| 7 | Dry-Fit Panels | N/A | N/A | 3–5 min per panel | Easy | Best practices for cutting composite wall panels |
| 8 | Dust Management | Vacuum, HEPA collector | N/A | Ongoing | Easy | What dust is produced when cutting WPC? |
| 9 | Batch Processing | Circular saw, straight-edge guide | Carbide-tipped | Varies | Medium | Saves time and ensures consistency |
| 10 | Pre-Sand & Final Check | Sandpaper, clamp | N/A | 5–10 min | Easy | Prevents rework, ensures uniform finish |
How To Cut Wpc Wall Panel Step-by-Step Illustration Guide
Step 1: Measure and Mark
- Panel on workbench with tape measure, pencil marking, masking tape along line.
Step 2: Secure the Panel
- Panel clamped on both ends for stability.
Step 3: Choose and Prepare Tool
- Circular saw, jigsaw, miter saw, and utility knife lined up. Blade types labeled.
Step 4: Execute Straight Cuts
- Circular saw following straight-edge guide, blade enters from back side, steady feed.
Step 5: Execute Curved Cuts & Corners
- Jigsaw guided along pencil line, drill starter hole for interior cuts.
Step 6: Edge Finishing
- Sandpaper smoothing edges, slight chamfer.
Step 7: Dry-Fit Panels
- Panels placed against wall with expansion gaps visible.
Step 8: Dust Management
- Vacuum near cutting area; worker wearing mask and glasses.
Step 9: Batch Processing
- Multiple panels stacked, cutting repeated straight cuts.
Step 10: Pre-Sand & Final Check
- Sand edges before installation, hands checking fit against wall.
How To Cut Wpc Wall Panel Cost and Time-Saving Tips
- Plan All Cuts Before Starting: Layout panels, mark cuts once.
- Use Scrap Panels: Test cuts to avoid errors.
- Choose the Right Blade: Fine-tooth or carbide-tipped prevents rework.
- Straight-Edge Guide: Ensures accuracy for long cuts.
- Steady Feed Speed: Balances time efficiency and cut quality.
- Batch Cuts: Straight cuts first, then curves and corners.
- Organized Workspace: Reduces downtime.
- Pre-Sand Edges: Sand before mounting to save time.
- Dry-Fit Panels: Avoids re-cutting after installation.
- Dust Management: Keeps workspace clean and safe.
